I have been enjoying the gift of this wood heart shaped tray since Valentine’s Day. To celebrate spring I have filled it with lavender and yellow Coin Ruched flowers.
Most are made with the TR700 Jumbo Coin Ruching Guide produced by Quilting Creations International, TR500 was used for the smaller ones.
Cut 7 3/4 to 8 inch circles of fabric for blossoms. Fold circle in half with the grain. Place TR600 Coin Ruched Blossom Guide on folded circle with etched dash line on the fold. Mark with your favorite marker. I use Mircon Pigma, Frixion or ceramic mechanical to mark the scallops and the dots.
Step 2
Open circle and place etched dash line on the fabric fold line, lining up the center dot to mark the other half of the circle.
Stitching the Petals
Thread a milliner needle with matching hand quilting thread and knot. Fold raw edge under so folded edge is at the point of any scallop. Sew a 1/4 inch running stitch around each scallop, turning the raw edge under as you go.
Finish Gathering
Sew around last scallop but do not knot or finish off.
Measuring
Patterns will call for specific sizes. Measurement is taken across the gathering line. This one measures 3 inches.
Blossom Ready to Shape
Looks like a little pilgrim bonnet at this point.
Preparing to Applique
Use basting glue or 4 quilters pins to position blossom. Then with milliner needle and hand quilting thread, stitch between each petal to applique in place.
Backside ViewGathering the Center
Find the center dot and stitch in place, by coming up and back down in nearly the same spot, then repeat for all the other dots, in any order you come to them.
Completed BlossomBlossoms as Tulips
Or you can stretch them out with the petals all together to make tulips.
Selecting the right binding and finishing technique for your quilt is important. Whether you are making for yourself, as a gift or entering is competitions, how the quilt is finished plays big in first impressions.
This little quilt was made by Carol Williams and machine quilted by Kathy Conway. A Challenge at Quilt Til You Wilt, in Odessa, WA, several years ago, had Carol receiving my bag of scraps to create a quilt top and she made cats, knowing I like them. I asked Kathy to quilt before it is finished, including it in my experiment of embellishing after quilting. Kathy did a beautiful job.
Now the kitties will get faces and whiskers, and some coin ruched and gathered blossoms to lounge among.
Your part in this project is to select a finishing option. A. scrappy binding, as on the left side in the photo. B. brown stripe that matches the skinny border, as on the right. C. the pink border fabric. D. since I have not trimmed the quilt, I could add another narrow border of the brown strip and finish with the scrappy binding.
Please vote for your selection, or make other finishing suggestions in the comments below.
In the top photo, the marked strips are shown gathered along the marked lines. Use a long running stitch, almost 1/4 inch long. Use hand quilting thread for strength and durability, and match color to fabric. The contrasting color shown here is for photography purposes.
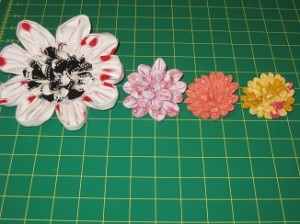
You can see the black and white, coin ruched 2 1/2 inch strip has been placed at the center of the finished 5 inch strip to make a Jumbo flower with the TR700 Jumbo Coin Ruching Guide. The pink blossom is made with the TR500 Large Coin Ruching Guide and the peach and multi color yellow flower are made with the TR400 Small Coin Ruching Guide.
The Piecing Pals, Coin Ruching Guides are used to mark even scallop shapes for hand stitching around and form petals that can be shaped into flowers and other dimensional embellishment. Frixion pens are very handy for marking the strips. A burst of hot air from a hand held hair dryer will remove any marks that might show after ruching.
The top strip was cut 5 1/2 inches by the width of the fabric (WOF)
The second strip was cut 2 1/2 inches by WOF and the bottom strip was cut 1 1/2 inches by WOF. Wrong side was folded together and the raw edges basted together about 1/8th inch from the raw edge along the length of the strip. DO NOT PRESS, you want to keep the folded edge pliable. This step will keep the layers in place while you mark and stitch. If you are using the Coin Ruched Blossom Guide and circles of fabric, no basting is required.
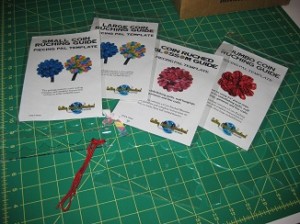
These Piecing Pals Coin Ruching Guides are designed by me, produced by Quilting Creations International and are available at most quilt shops and online outlets. The guides are used to mark the stitching line for gathering the fabric into petals. Each size and style has complete instructions included in the packet. A strip the width of fabric will make a 2-3 inch blossoms with the Small (TR400) or Large Guide (TR500), 2 strips of fabric are needed for the 5-6 inch (TR700) Jumbo size. The Blossom Guide (TR600) is for 7 3/4-8 inch circles.
Create a bold bouquet of blossoms with our NEW Jumbo Coin Ruching Guide TR700, produced by Quilting Creations International, and bring spring into your home early. You can make the flowers for Big Ruched Bouquet and Doily #1601 or embellish quilts and apparel. Big blossoms make a bold statement adorning hats, purses and tote bags. The possibilities are endless for decorating with these easy floral beauties.
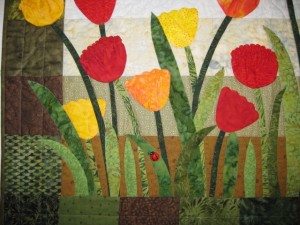
Tulip Fields, #1401 is a fun dimensional applique, wall quilt in my pattern line. Tangled Threads Quilt Shop in Lynden, Washington, made a model for their shop. This is a close up of the cute little ladybug button they added to their wall quilt. It fits in perfectly, adding additional embellishment and interest to the quilt. The dimensional tulips are a variation of Ruched Blossoms, made with the Piecing Pals, Coin Ruched Blossom Guide TR600, from Quilting Creations International. You can find more pictures of Tulip Fields on my Facebook page and on my website. Pictures of the trunk show Tangled Threads recently hosted may be found on their Facebook photo page. Laura Estes Stencils and Coin Ruching Tools may be found on Quilting Creations International website.
I find it inspiring to see what additions quilters make to the quilts they create from my patterns. A pattern is a guideline to get you where you want to go. Unless you are a quilt shop you’re probably not going to hang the pattern up with the quilt, and even then, your ideas can provide inspiration for your customers.
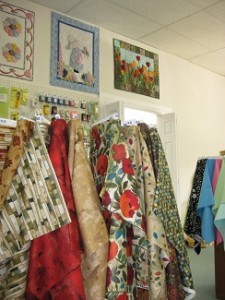
These are just a few of my designs on display at Experience Quilts! in Odessa, WA for their Grand Opening March 1 and 2. They carry the full line of my designs. Pictured here from left to right, Dresden at Heart, Suzanne’s Garden and Tulip Fields, any of which would look lovely done up in the fabric grouping pictured in the foreground.
All of these designs feature applique and Coin Ruching. Dresden at Heart may be made in a larger size for a bed quilt.
Applique, ruching and dimensional embellishments of quilts